
The “mAh” Lie Is Costing You Money
Most people are bad at math.
They are even worse at physics.
That is why they buy a $30 power bank from a gas station, plug it into a high-performance laptop, and wonder why the battery percentage is still dropping.
If you are serious about remote work, you are probably running a dual-screen setup. You have your laptop. You have a portable monitor (like an ASUS ZenScreen or a cheap Arzopa). You feel productive.
Until the battery dies.
Now you are hunting for an outlet in a crowded Starbucks like a desperate amateur.
Time is money. If you bill $100 an hour, and you lose 30 minutes finding power, you just lost $50. Do that twice a week, and you lose $5,200 a year.
Stop being cheap. Start being calculated.
This article isn’t about “cool gadgets.” It is about the ROI of uptime. I am going to teach you the math you need to keep a dual-screen setup running without a wall outlet.

The Three Variables That Matter
Forget the marketing fluff on the box.
Companies lie. They put big numbers on the packaging to trick you. They highlight “20,000mAh” because it sounds huge. It means nothing if the voltage is low.
To power a dual monitor setup, you only care about three things:
- PD (Power Delivery): Can it push electricity fast enough?
- Wh (Watt-hours): How much total gas is in the tank?
- Passthrough: Can it charge itself while charging your gear?
If you ignore these, you are buying a paperweight.
1. The Speed: You Need 65W Minimum
Your laptop needs power to run. Your screen needs power to light up.
Most standard USB-A ports push 5 Watts (5W). That charges a phone slowly. It does nothing for a laptop.
A modern ultrabook (MacBook Air, Dell XPS) idles around 15W but jumps to 45W or 60W under load. A portable monitor pulls another 8W to 15W.
The Math:
Laptop (45W) + Monitor (10W) = 55W Total Draw.
If your power bank only outputs 20W, your battery will still die. It will just die slower. This is called “net drain.”
You need a power bank with a USB-C PD port rated for 65W or higher. Ideally, 100W.
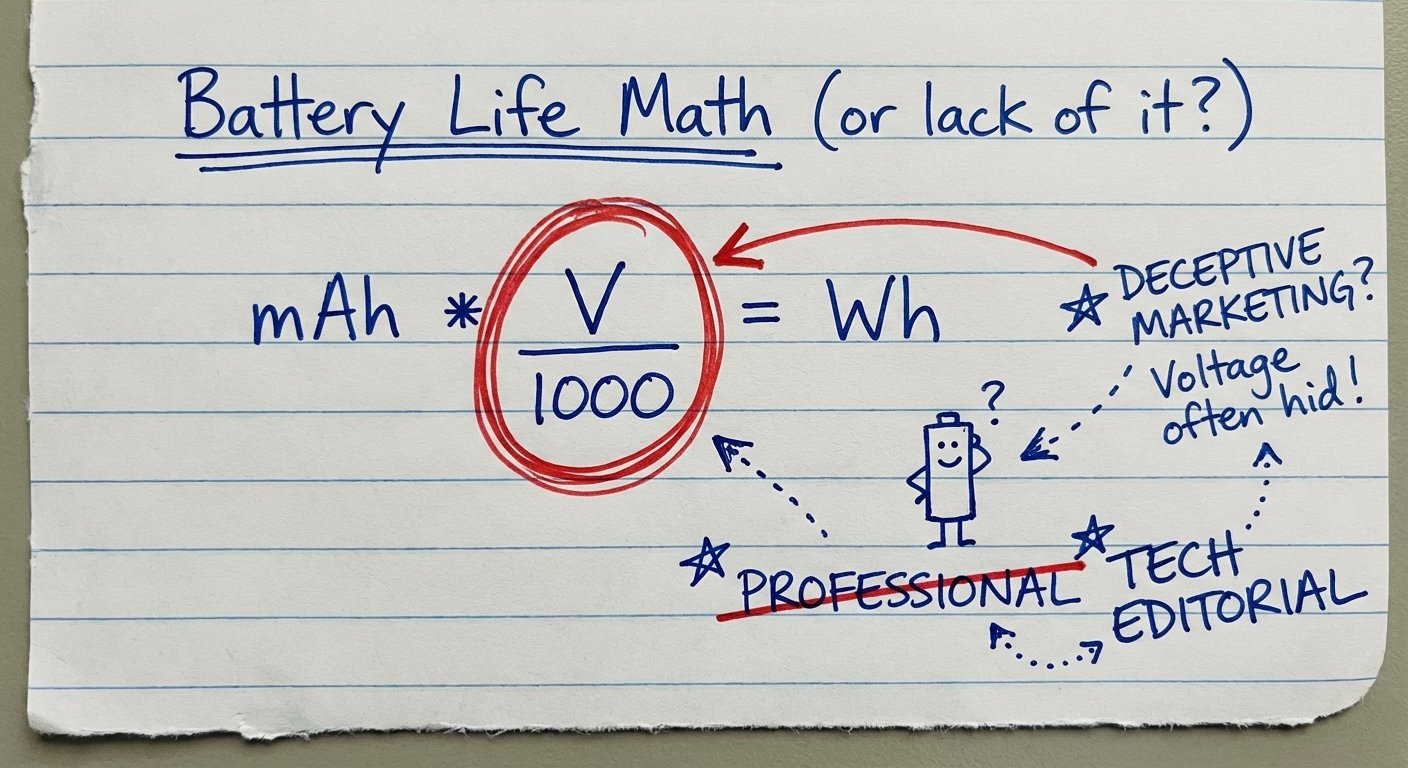
2. The Tank: Why mAh is a Scam
Battery capacity is usually sold in milliamp-hours (mAh). This is misleading.
A 20,000mAh battery sounds massive. But that rating is usually at 3.7 Volts (the internal battery voltage). Your laptop needs 20 Volts.
When you convert voltage, you lose capacity. We need a universal unit of measurement. That unit is Watt-hours (Wh).
Here is the formula to find the truth:
(mAh) x (Volts) / 1000 = Watt-hours
Let’s look at a standard “20,000mAh” bank:
20,000 x 3.7V / 1000 = 74Wh.
Now, let’s apply reality. Power conversion is not 100% efficient. You lose energy to heat. Assume 20% loss. That 74Wh is actually 59Wh of usable power.
If your dual screen setup burns 60 Watts per hour, that battery gives you less than 60 minutes of extra work.
Is that worth $50? Maybe. But don’t expect it to last all day.
The Gear That Actually Works
I have tested the garbage so you don’t have to. Below are the only power banks I would trust my workflow to. They have high PD output and high capacity.
Note: Prices fluctuate. I have provided the current estimated range.
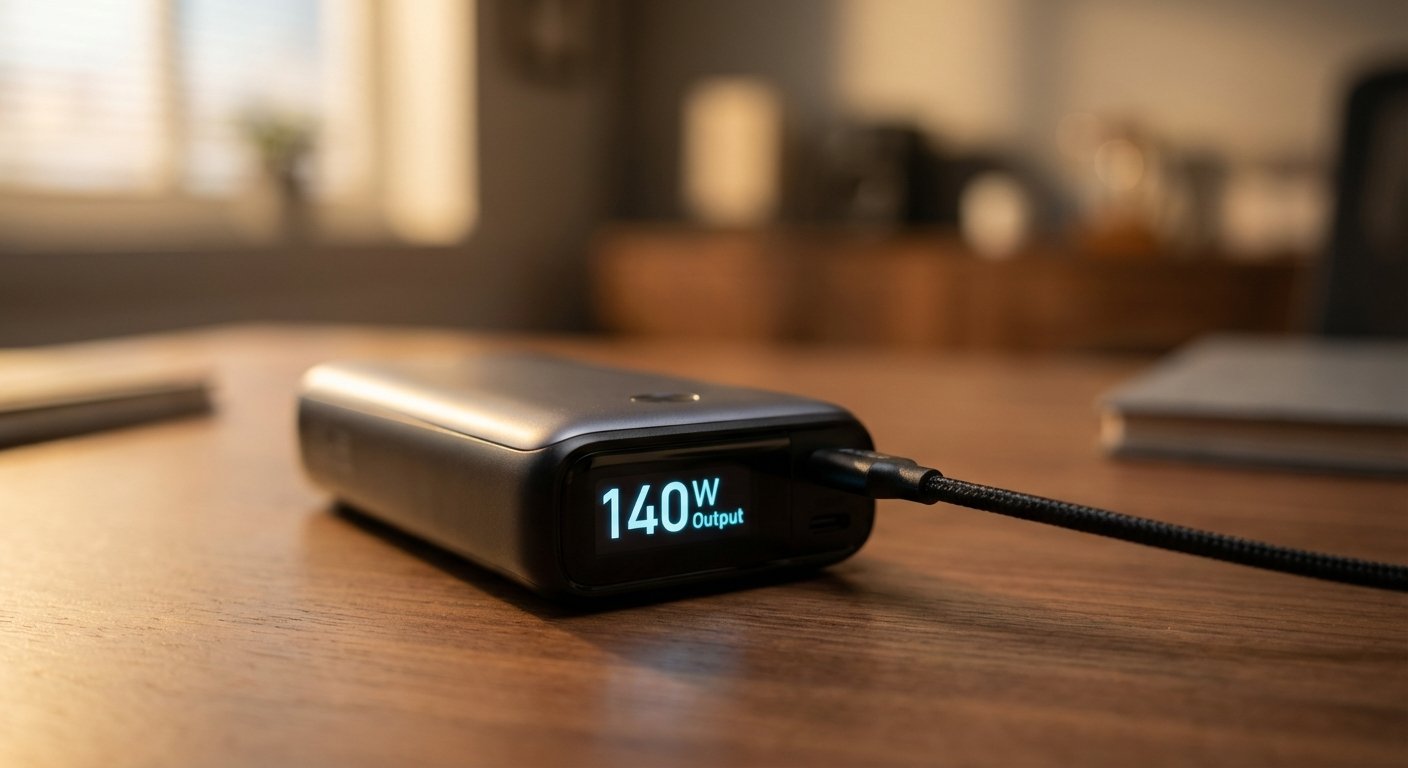
1. The Heavy Hitter: Anker 737 (PowerCore 24K)
This is the gold standard. If you want no headaches, you buy this.
It has a digital screen that tells you exactly how many watts are going in and out. This is crucial for troubleshooting. You can see instantly if your cable is bad or if your monitor is drawing too much power.
The Specs:
- Output: 140W max (can charge a MacBook Pro 16″ at full speed).
- Capacity: 24,000mAh (86.4Wh).
- The ROI: High. It recharges itself in under an hour if you have a fast wall charger.
Estimated Price: $100 – $150
2. The Laptop Bag Friendly: Baseus Blade 100W
The Anker is a brick. It is thick. It makes a lump in your backpack.
The Baseus Blade is flat. It looks like a laptop. It slides right into the sleeve next to your computer. For digital nomads who travel light, form factor matters.
It outputs 100W. That is plenty for a laptop plus a screen. It has four ports so you can charge your phone at the same time.
The Specs:
- Output: 100W PD.
- Capacity: 20,000mAh (74Wh).
- The ROI: It’s usually cheaper than the Anker. You get slightly less capacity, but better portability.
Estimated Price: $80 – $110
3. The Overkill: Shargeek Storm 2
Do you need a transparent case? No. Does it look cool? Yes. Is it powerful? Very.
This is for the person who wants the absolute maximum legally allowed on an airplane. The FAA limit is 100Wh. The Shargeek hits 93.5Wh. It is right at the red line.
It has a full operating system on the little screen. You can adjust DC voltage output. It is for tech nerds who want total control.
The Specs:
- Output: 100W.
- Capacity: 25,600mAh (93.5Wh).
- The ROI: Lower pure value per dollar, but highest capacity allowed on a flight.
Estimated Price: $160 – $200
The Setup: How to Wire It
Buying the battery is step one. Plugging it in wrong is where people fail. There are two ways to do this. One is good. One is bad.
The Bad Way: The Daisy Chain
Wall/Battery -> Laptop -> Monitor
In this setup, you plug the battery into the laptop. Then you plug the monitor into the laptop. The laptop has to power itself and pass power through to the screen.
Why it fails: This creates excessive heat in the laptop. Thermal throttling kicks in. Your laptop slows down. Also, some USB-C ports on laptops support data transfer to a monitor but struggle to pass enough voltage through to keep the brightness up.
The Good Way: The Split (Pass-Through)
If your portable monitor supports “Pass-Through Charging” (most decent ones do), do this:
Battery -> Monitor -> Laptop
You plug the high-power USB-C cable from the Anker 737 into the Power Input of the monitor.
Then, use a second USB-C cable from the monitor’s output to the laptop.
Why it wins: The monitor takes the juice it needs first. It passes the rest to the laptop. This usually results in a brighter screen and a cooler laptop. It separates the heat sources.
Warning: Check your monitor specs. Some cheap monitors can’t pass more than 45W. If your laptop needs 85W, this won’t work. In that case, use two ports on the battery: One to the laptop, one to the monitor.

The “Hidden” Cost: Cables
I see this every day. Someone buys a $150 battery and uses the white cable that came with their iPad five years ago.
Garbage.
Cables are rated for wattage. Most cheap cables are rated for 60W max. If you try to push 100W through a 60W cable, the chip inside the cable tells the battery to slow down for safety.
You paid for 100W. You are getting 60W. You are losing 40% of your speed because you were too cheap to buy a $15 cable.
Get a cable marked “E-Marker” or rated for 100W / 5A. If it doesn’t say 100W on the listing, don’t buy it.
Estimated Price: $15 – $25
Conclusion: The ROI of Power
Let’s do the final math.
A good setup (Anker 737 + Cables) costs you roughly $170.
A portable monitor consumes about 10W-15W. A laptop doing heavy work (video editing, spreadsheets, coding) consumes 45W-50W.
Total burn rate: 65W.
A 24,000mAh battery (86Wh) gives you roughly 1.2 to 1.5 hours of extra runtime at full load.
That doesn’t sound like much. But combine that with your laptop’s internal battery (usually 3-5 hours), and you now have a full 8-hour workday completely off-grid.
Without the battery, you die at 2:00 PM. With the battery, you finish the day.
If being able to close a deal, finish a project, or answer a critical email from a park bench or an airplane seat is worth $170 to you, then buy the gear.
If not, stay tethered to the wall with the rest of the herd.
The choice is yours.